How to Use Data Loss Prevention in Office 365
There are many recommendations provided from security firms and government agencies that provide specific ways to stop the most pervasive and dangerous threats. These controls often go deeper than focusing on security threats. They go into how we can protect and control data access within any application that we use.
Data breach is one of the biggest fears that any company can face today. The idea that company data is out in the wild is enough for organizations to put stringent and controlling mechanisms in place.
With the move to Cloud services, solutions that limit data flow and access are even more important. Microsoft’s Office 365 provides a service for Data Loss Prevention (DLP), which is able to identify sensitive or critical data within your organization.
Data Loss Prevention helps businesses follow industry regulations and protect sensitive information. It also prevents inadvertent disclosure. Sensitive information that you need to prevent leaking outside your organization includes financial data, such as credit card numbers, social security numbers, or health records. With a DLP policy, you can identify, track, and protect sensitive information across Office 365.
Which Subscriptions includes DLP?
Security & Compliance Center availability for Business and Enterprise plans
Feature | Office 365 Business Essentials | Office 365 Business | Office 365 Business Premium | Office 365 Enterprise E1 Office 365 US Government G1 | Office 365 Enterprise E3 Office 365 US Government G3 | Office 365 Enterprise E5 | Office 365 Enterprise F1 Office 365 US Government F1 |
Yes | Yes | Yes | Yes | Yes | Yes | Yes | |
No | No | No | No | No | Yes | No | |
Threat management such as mail filtering and anti-malware | Yes | Yes | Yes | Yes | Yes | Yes | Yes |
Advanced threat management such as customer lockbox and threat explorer for phishing campaigns6 | No | No | No | No | No | Yes | No |
Yes | Yes | Yes | Yes | Yes | Yes | Yes | |
No | No | No | No | Yes | Yes | No | |
Yes | Yes | Yes | Yes | Yes | Yes | Yes | |
No | No | No | No | No | Yes | No | |
Yes | No | Yes | Yes | Yes | Yes | Yes | |
Yes | Yes | Yes | Yes | Yes | Yes | Yes | |
No | No | No | No | Yes | Yes | No | |
No | No | No | No | No | Yes | No | |
Litigation Holds (including query-based Litigation Holds) | No | No | No | No | Yes | Yes | No |
No | No | No | Yes3 | Yes4 | Yes4 | No | |
Manual retention/deletion policies | No | No | No | Yes | Yes | Yes | No |
 Note: Note: |
|---|
| 1 Data governance enables users to create, publish, and manually apply labels to documents; import data using drive shipping or over the network; and create and apply retention/deletion policies across workloads, users, and groups. Retention policies applied to mailboxes require Office 365 Enterprise E3 or E5. 2 Advanced data governance allows you to retain important information and delete unimportant information by classifying information based on a retention or deletion policy or both. It includes intelligent/automated actions such as recommending policies, automatically applying labels to data, applying labels based on sensitive data types or queries, disposition review, and use of smart import filters. It also includes the Supervision feature for reviewing employee communications for security and compliance purposes. 3 50 GB limit. 4 Unlimited. 5 Advanced eDiscovery is supported in the United States and in the Western Europe (Netherlands) region. (Customer data from Canada and Asia Pacific is exported to the United States. Customer data from Europe, the Middle East, and Africa is exported to Western Europe [Netherlands].) 6 Advanced Threat Protection is available in Office 365 Enterprise E5 and as a standalone service for Office 365 Enterprise E1 and Office 365 Enterprise E3. |
Security & Compliance Center availability for Standalone plans
Feature | Exchange Online Plan 1 | Exchange Online Plan 2 | Exchange Online Kiosk | SharePoint Online Plan 1 | SharePoint Online Plan 2 | Skype for Business Online Plan 1 | Skype for Business Online Plan 2 |
Yes | Yes | Yes | Yes | Yes | Yes | Yes | |
No | No | No | No | No | No | Yes | |
Threat management such as mail filtering and anti-malware | Yes | Yes | Yes | Yes | Yes | Yes | Yes |
Advanced threat management such as customer lockbox and threat explorer for phishing campaigns | No | No | No | No | No | No | No |
Yes | Yes | Yes | Yes | Yes | Yes | Yes | |
No | Yes | No | No | Yes | No | Yes | |
Yes2 | Yes | Yes | Yes | Yes | Yes | Yes | |
No | No | No | No | No | No | No | |
Yes | Yes | Yes | Yes | Yes | Yes | Yes | |
Yes | Yes | Yes | Yes | Yes | No | No | |
No | Yes | No | No | Yes | No4 | No4 | |
No | No | No | No | No | No | No | |
Litigation Holds (including query-based Litigation Holds) | No | Yes | No | No | Yes | No | No |
Yes | Yes | No | Yes | Yes | No | No | |
Manual retention/deletion policies | No | Yes | No | No | Yes | No | Yes |
 Note: Note: |
|---|
| 1 Data governance enables users to create, publish, and manually apply labels to documents; import data using drive shipping or over the network; and create and apply retention/deletion policies across workloads, users, and groups. Retention policies applied to mailboxes require Office 365 Enterprise E3 or E5. 2 Requires purchase of Exchange Online Archiving add-on. 3 Advanced data governance allows you to retain important information and delete unimportant information by classifying information based on a retention or deletion policy or both. It includes intelligent/automated actions such as recommending policies, automatically applying labels to data, applying labels based on sensitive data types or queries, disposition review, and use of smart import filters. It also includes the Supervision feature for reviewing employee communications for security and compliance purposes. 4 Skype conversations are stored as part of the mailbox. 5 Advanced eDiscovery requires Office 365 Enterprise E5 or an add-on license. 6 Skype Archiving is within the user’s mailbox. |
Source:
https://technet.microsoft.com/en-us/library/dn933793.aspx
How Do Data Loss Prevention Policies Work?
DLP detects sensitive information by using deep content analysis. It can identify sensitive data without affecting people who work with the rest of the content.
Once created, DLP Policies are stored and synchronized to content sources such as:
- Exchange Online
- OneDrive for Business
- SharePoint Online Sites
- Office 2016 desktop programs
After they’re synchronized, these policies will start to enforce the required actions.
What Does a Data Loss Prevention Policy Contain?
A DLP policy contains 2 things: first, locations, such as Exchange Online, SharePoint Online, and OneDrive for Business sites, and second, conditions for execution and actions to perform.
What is a Sensitive Information Type?
Office 365 includes definitions for sensitive information that are unique to different countries. This information can be credit card numbers, bank account numbers, and passport numbers.
Each sensitive type can be keywords, internal functions, regular expressions, or pattern matches. This helps DLP detection achieve the highest degree of accuracy while also reducing the number of false positives that can interrupt people’s work. DLP policies allow for detection of different types of content within a single policy.
How to Create a Data Loss Prevention Policy
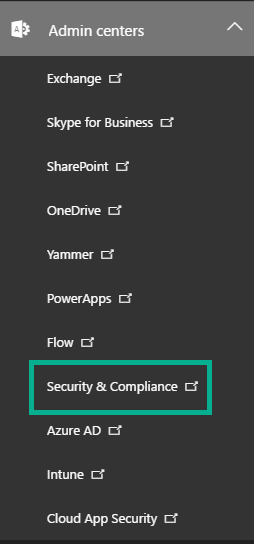
To create a DLP policy, first log into the Office 365 tenant, select Admin centers and then choose Security & Compliance.
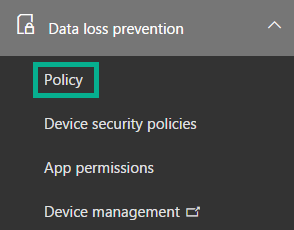
- Once the Security & Compliance center is loaded, expand the Data loss prevention menu and choose the Policy menu item.
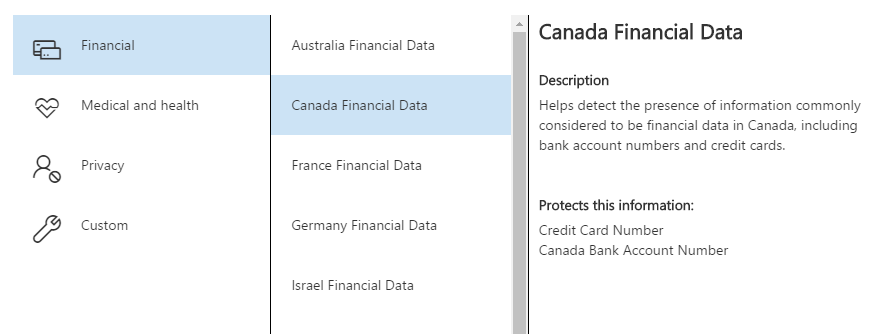
- Select the Create a policy button. A wizard interface will load from the right side, where you can set the properties needed for the policy. Choose
- the industry regulation category, which will display regional and country specific regulations.
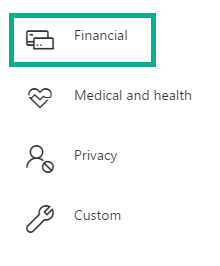
- Clicking the Financial option will display country specific policies that you can use.
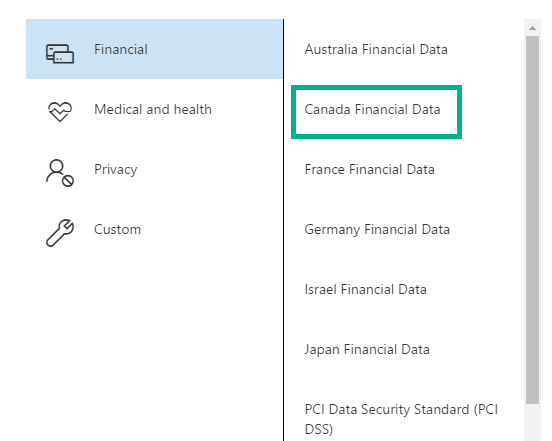
- Clicking a regulation will display a short description and the information it protects.
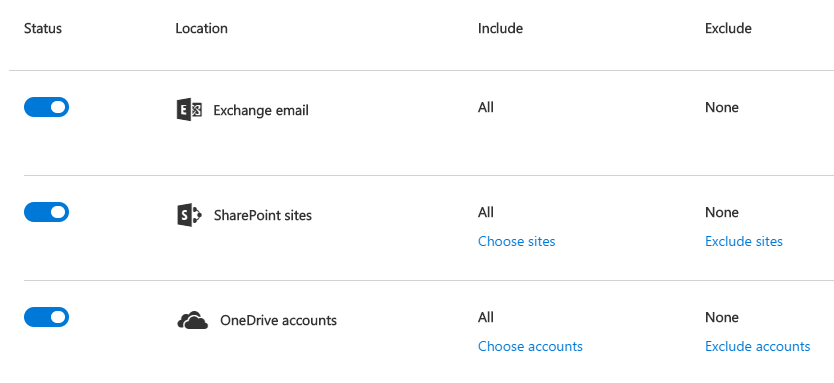
- Once selected, click the next button and type the name and description for the policy, then press next. Not every location warrants a policy. You either select “All locations” or pick the locations that you want the policy to apply. You can decide between Exchange email, SharePoint sites, and OneDrive accounts. For SharePoint and OneDrive sites, you can choose sites or accounts as well as exclude some as needed.
- Once you have defined the locations, press the next button. Now you can either choose the simple or advanced option. Simple settings make it easy to create the most types of DLP policies without creating rules. Advanced settings use the rule editor to give you control over every setting of your policy. The simple setting option covers most common scenarios.
Even with the simple option, you still need to choose the detection type for the policy you are creating.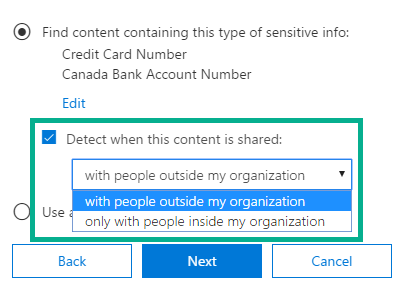
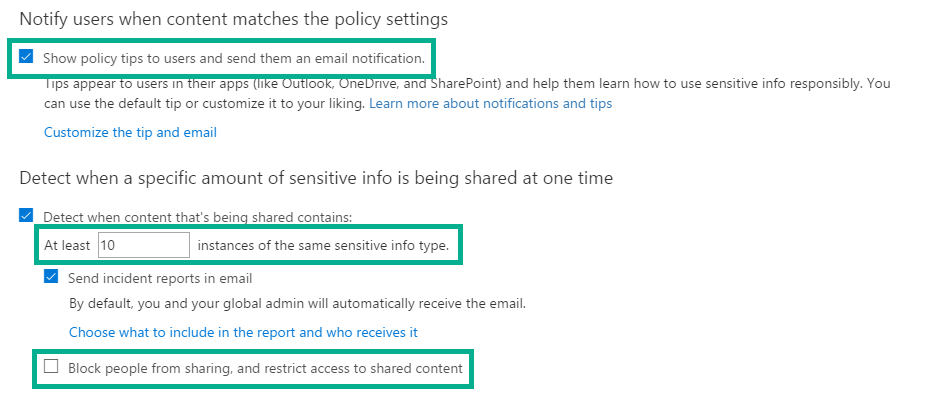
- Once you choose whether to inspect external or internal content, press the next button. You will need to define policy tips for the end-users. Then, you can set an alert for the number of times a sensitive information type is shared with the same content. Finally, chose whether or not to block people from sharing and restrict access to the content.
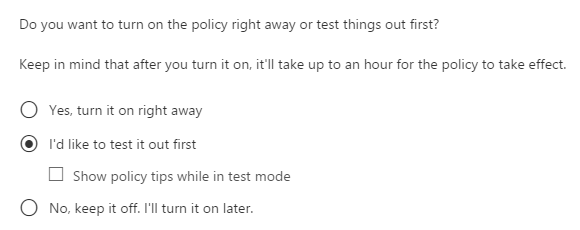
- You can turn the rule on right away, test it, and show or hide policy tips, or simply not enable it at all.
Advanced Data Loss Prevention
Sensitive information types don’t cover organizational specific data. For example, you may have specific data for customer records that you need to capture.
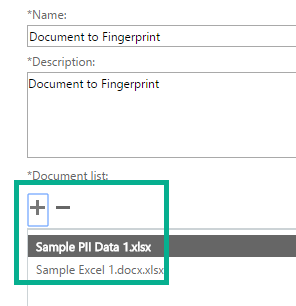
Within Exchange Online, you can document fingerprint files. Most of these features are managed and controlled in the Security & Compliance center.

Click the Manage document fingerprints. It will launch a wizard so that you can assign a name and then attach documents.
Within Exchange, the new information created can be used within standard DLP policies.
The End-user Experience
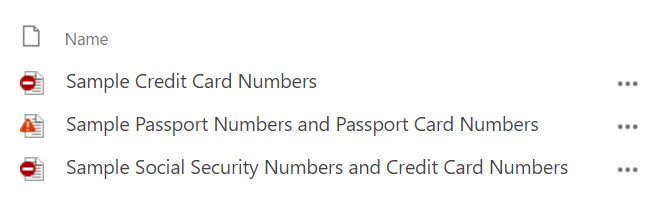
Once you have created and enabled DLP policies, it will start to inspect content. For content within SharePoint or OneDrive for Business, any content that matches the policy is marked with both an icon and changes. It can display policy tips if you allowed them within the policy.
The hover panel for the items will display the policy and indicate if it’s blocked.
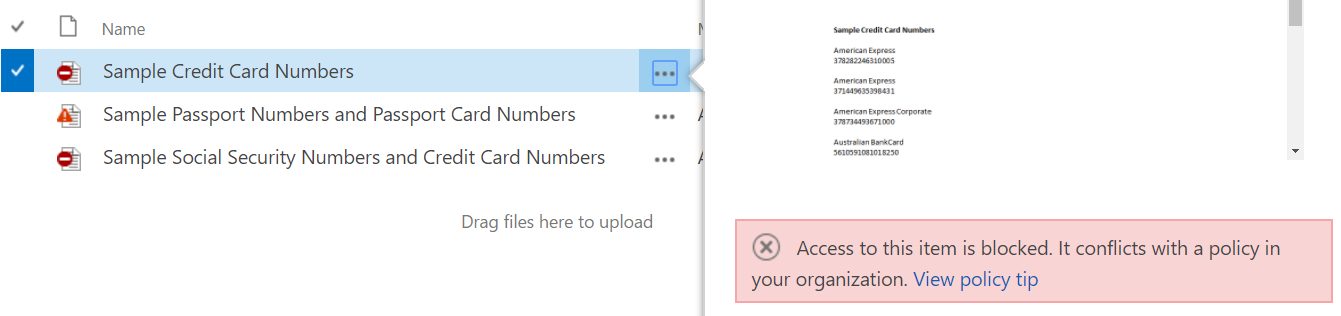
When a user clicks the View policy tip, he will see the policy details. He can fix the problem with the resolve button. Fixing the problem overrides the current violation and marks it as normal content.
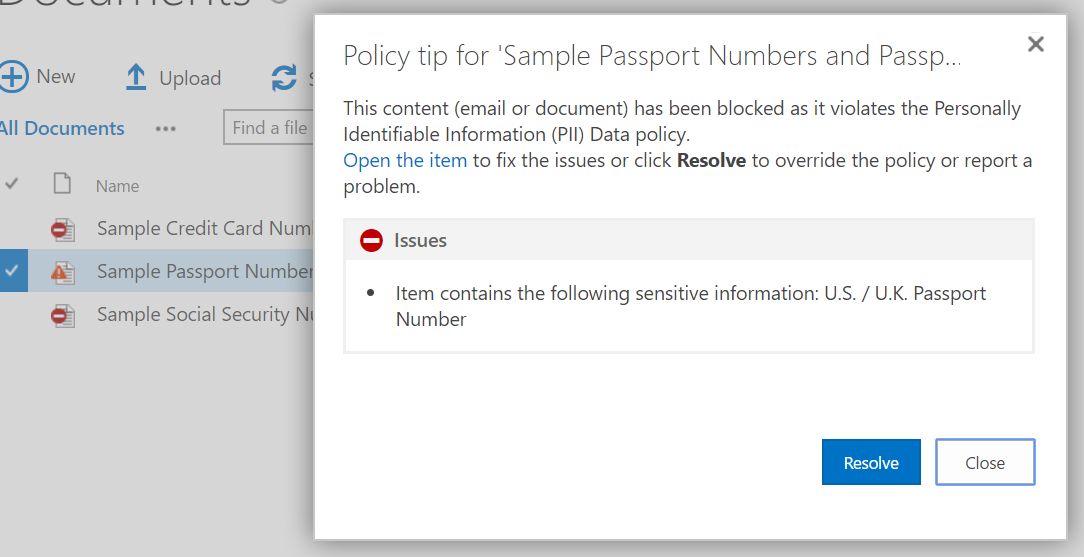
This is useful for notifying the end-user with alerts if configured within the policy itself. It also makes changes to the presentation of the content so that it is obvious that it’s in violation.
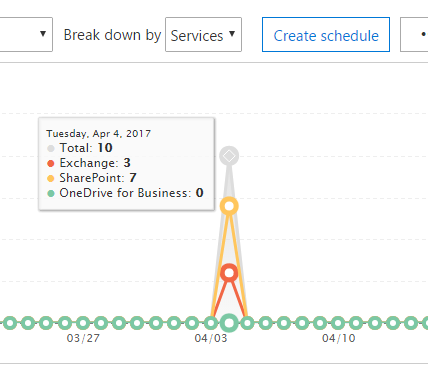
After you create and turn on DLP policies, you need to verify that they’re helping you stay compliant. With DLP reports, you can view the number of policies and rules that match over time, and the number of false positives and overrides. You can filter those matches by location, time frame, and even narrow it down to a specific policy, rule, or action. With DLP reports, you can get business insights and:
- Focus on specific time periods and understand the reasons for spikes and trends.
- Discover business processes that violate your organization’s compliance policies.
- Understand any business impact of the DLP policies.
As well, you can use the DLP reports to fine tune your DLP policies as you run them.
It is well known that the weakest link in any cyber threat control is the end-user. Data Loss Prevention helps control and guard company data and content. By providing notifications and way to resolve issues, it removes some of the worry about the content stored.